Industry 4.0 and the Industrial Internet of Things (IIoT) are trending topics in today’s companies and on social media platforms such as LinkedIn. There are many statistics provided and shared by well-known companies (e.g. McKinsey, Accenture, PwC, etc.) that show that IIoT solutions have a positive impact on relevant KPIs such as productivity, efficiency, quality, costs and many more.
As an MBA graduate, I am following those discussions and agree that it is an important topic for todays and future industry. Nevertheless, I also experienced a lot of confusion when it comes to implementing such technologies. This leads to companies not knowing where to start and therefore hesitating.
Due to the wide variety of hardware, software, and service provider in the field of IIoT, as well often misleading information, it can be difficult to get the information needed to get started.
But it does not have to be.
In our recent project at McKinsey´s Digital Capability Center Venice, I learned that a simple project of retrofitting one machine can be a good starting point. From there, it can easily grow to a more advanced IIoT platform at a later stage. All it needs in the beginning is a little bit of standard hardware such as a couple of sensors, a gateway, and an industry ready computer.
Within the mentioned project my IT-colleagues showed me how to retrofit a machine by myself. They provided me the following steps as a guideline, so that at the end of the day I was able to extract and visualize valuable information out of my first self-retrofitted machine:
- What do you want to measure and why?
- Which sensors can you use and where can you put them?
- Install the sensors and connect them with the Factorycube (industry ready computer).
- Connect the Factorycube with your personal computer to implement the data flows.
- Visualize the extracted data by creating your personal Grafana dashboard.

What do you want to measure and why?
Before getting started with installing the hardware components, it is important to think about what to measure and why. Looking at the machine and understanding the processes behind is a key element. What insights do you want to know from the data?
In my case, I wanted to know if the machine is running and how many pieces it is producing over a period of time. If the machine is not running, I wanted to know the reason behind. To measure the activity and output of the machine I used vibration and the piece count as a measurement. A maintenance flap and the workers input served me as a measurement to recognize the reason for a standstill.
Which sensors can you use and where do you place them?
After deciding what to measure and why, the next step is to think about what kind of sensors can be used and where they can be installed at the machine. It should be regarded that the sensors are not hindering the workflow of the machine and the operator in any way. Understanding the process and the functionality of the machine is necessary to make the right decisions.
In my case the machine is vibrating if it is running, hence I planned to use a vibration sensor to extract that information. With an inductive sensor at the maintenance flap, I planned to determine if the flap is open and therefore some kind of maintenance is conducted. Additionally, I planned to use a button bar to let the operator “interact” with the system, for example if there is a setup change or if the operator is having a break. To measure the number of pieces produced, I planned to use a light barrier sensor.
Install the sensors and connect them with the Factorycube (industry ready computer).
After planning, it is time to install the sensors. Not using any invasive methods is important to not harm the warranty claims of the machine. Hence it is recommended to use industrial adhesive tape, magnets, and clamps to attach the sensors to the machine. I used a combination of all three, depending on the sensor, to place all components. As soon as all the components are installed, they need to be linked to an IIoT (IO-link) gateway, which is connected to an industrial ready computer (Factorycube). The computer must run a software that is able to receive and process the data via MQTT. The United Open-Source Software Stack can be deployed freely on every computer to fulfill this task (UMH Documentation).
Connect the Factorycube with your personal computer to implement the data flows.
Now since everything is connected, a data flow from the sensors to the Factorycube is established. The next step is to implement some logics to transform the raw data to insights that answer the questions asked in the first step. In order to do so a private computer is used to connect to the Factorycube and set up the data flows with Node-RED (another Open-Source-Tool).
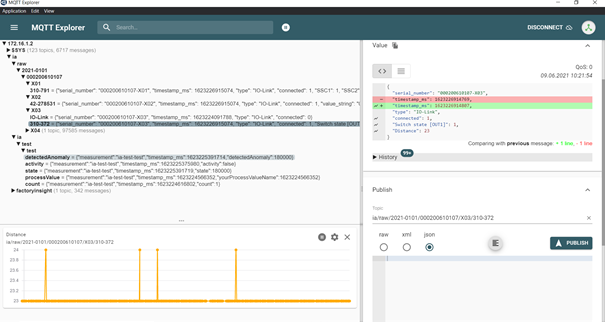
In my case, I needed to install a MQTT client first. The MQTT client allowed me to see the live data received by the sensors. With my internet explorer (Chrome) I accessed Node-Red (preinstalled on the Factorycube) to use the low-code programming environment to set up the data flows of each sensor.
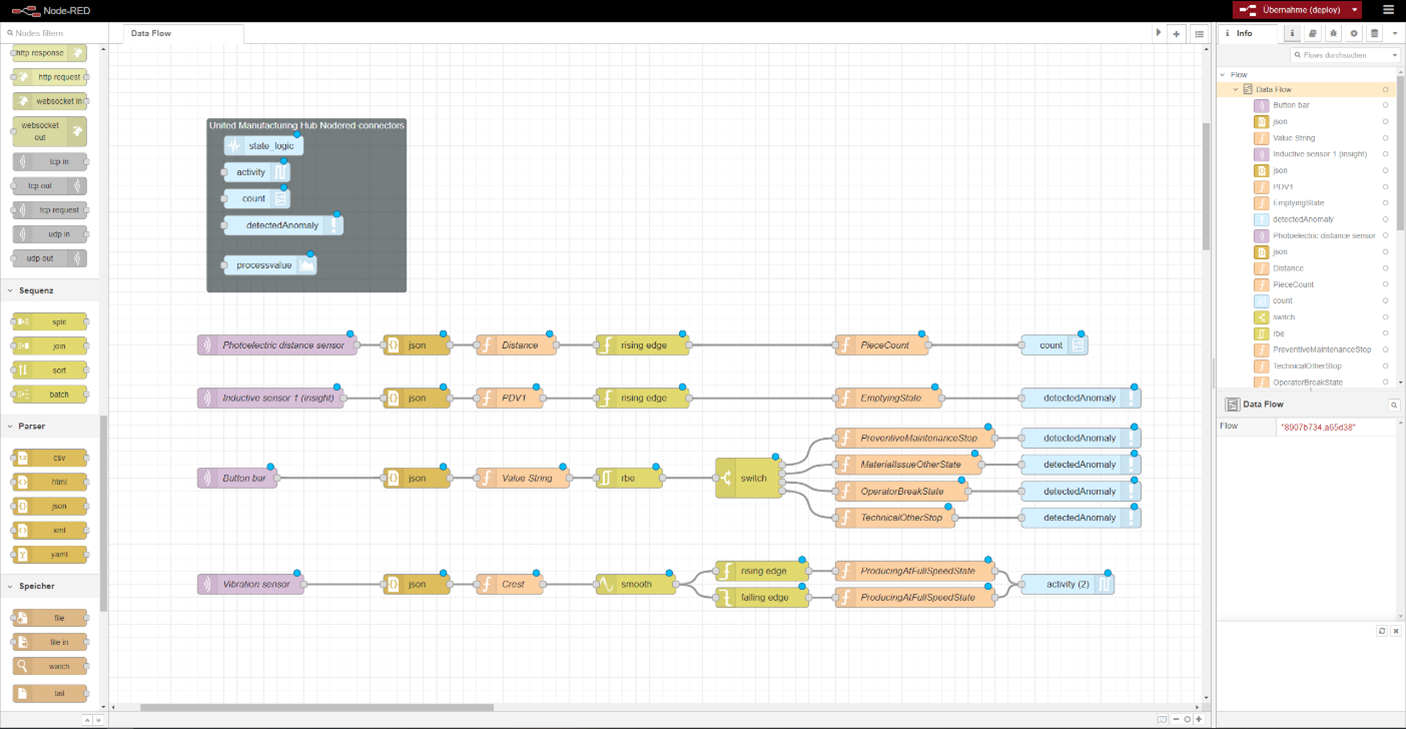
The nodes are set up by drag and drop and simply connecting them with a line. Using the United Open-Source Stack a lot of elements are preconfigured and can be easily used.
I started with a “Sensorconnect node” to access the raw data transmitted by the MQTT broker. The “Sensorconnect node” is connected to a “json node” to transform the data format. The subsequent “function node” is reducing the raw data to the value that is needed for the logic.
For example, I used the distance value of the light barrier to recognize if a piece is produced. The following “function node” checked if the distance value is above or below a set threshold. In this case if the value changing above the threshold, the attached “PieceCount node” will count one piece and forwards the information to a predefined “output node”.
This last node in the flow chart sends the message to the MQTT broker from where the data will be automatically processed and made available to further software features or data visualization.
Visualize the extracted data by creating your personal Grafana dashboard.
After the data is automatically processed and normalized by the software stack on the Factorycube, Grafana (also an Open-Source Tool) can be used to build a personalized dashboard and visualize the data. It offers predefined panels that only have to be configured with the data received by the sensors.
I build a simple dashboard that showed on one screen if the machine is running, a timeline and the output over time. The next step could be to show some important KPI’s such as OEE on the dashboard.

Conclusion
The above-mentioned project is a very basic starting point to gain first experiences in the topic of IIoT. Far more advanced solutions that can be done with the same infrastructure are the connection of modern machines with hundreds of data nodes and AI powered analytics.
The infrastructure can be set up in a way that the machines communicate with each other in order to optimize the processes in an environment that is protecting the valuable machines and data from outside threats.