Here is a step-by-step guide on how to deploy the UMH stack using minikube, a tool to quickly spin up a Kubernetes cluster in your local machine. This method is quicker than using a virtual machine with k3os, but less reliable. We suggest using minikube only for small tests.
If you are using a different way to install the software, make sure to install the following versions. Specifically installing minikube directly from the website results in a new version, which is not supported yet. Older versions are also not supported anymore.
- minikube 1.26.1
- Kubernetes 1.24.3
- Helm 3.10
Dependencies
- Verify that you have WSL installed. Open Powershell and type
wsl --status. If you get an error you probably need to install it. Refer to the Microsoft documentation on how to do that. - Docker Desktop. You can follow the Docker documentation here.
- Chocolatey.Read how to do that here.
Installation
- Open a PowerShell terminal. Be sure to use the option Run as Administrator.
- Install minikube
choco install minikube
when using Ubuntu you can also use the following commandcurl -LO https://storage.googleapis.com/minikube/releases/v1.26.1/minikube-linux-amd64 && sudo install minikube-linux-amd64 /usr/local/bin/minikube - Install helm
choco install kubernetes-helm - Install kubectl
choco install kubernetes-cli - Set the default driver for minikube. We recommend Docker, but you can use a variety of drivers. Read the Minikube docs for further information.
minikube config set driver docker - Start an instance of minikube with 2 CPUs and 4GB of RAM. You may need more if you decide to customize the services with the
development.yamlfile.minikube start --cpus 2 --memory 4096 - Create a namespace in Kubernetes
kubectl create namespace united-manufacturing-hub - Add the UMH repo
helm repo add united-manufacturing-hub https://repo.umh.app/ - Ensure it is up-to-date with
helm repo update - Install the stack
helm install united-manufacturing-hub united-manufacturing-hub/united-manufacturing-hub -n united-manufacturing-hub - Get the Helm config to import into UMHLens
kubectl config view - Open UMHLens on your device. You can get UMHLens for free from this GitHub Repository.
- Sometimes UMHLens automatically creates a minikube-Cluster. Click on Browse-Clusters to check. If there is no cluster you have to create it manually (follow step 14-18) otherwise continue with step 19.
- Click the three horizontal lines in the upper left corner and choose files → preferences
- Click on Kubernetes and select “Add custom repo”, type in
https://repo.umh.appas the URL and decide on a name for the repository. - Click again file → Add Cluster
- Paste the clipboard (which you got from
kubectl config view) into the kubectl prompt of UMHLens. - Click on Add Cluster.
- Click on Browse Clusters in Catalog, then connect to the Cluster.
- Click on Helm -> Releases and change the namespace from default to united-manufacturing-hub in the upper right corner
Enable minikube ingress
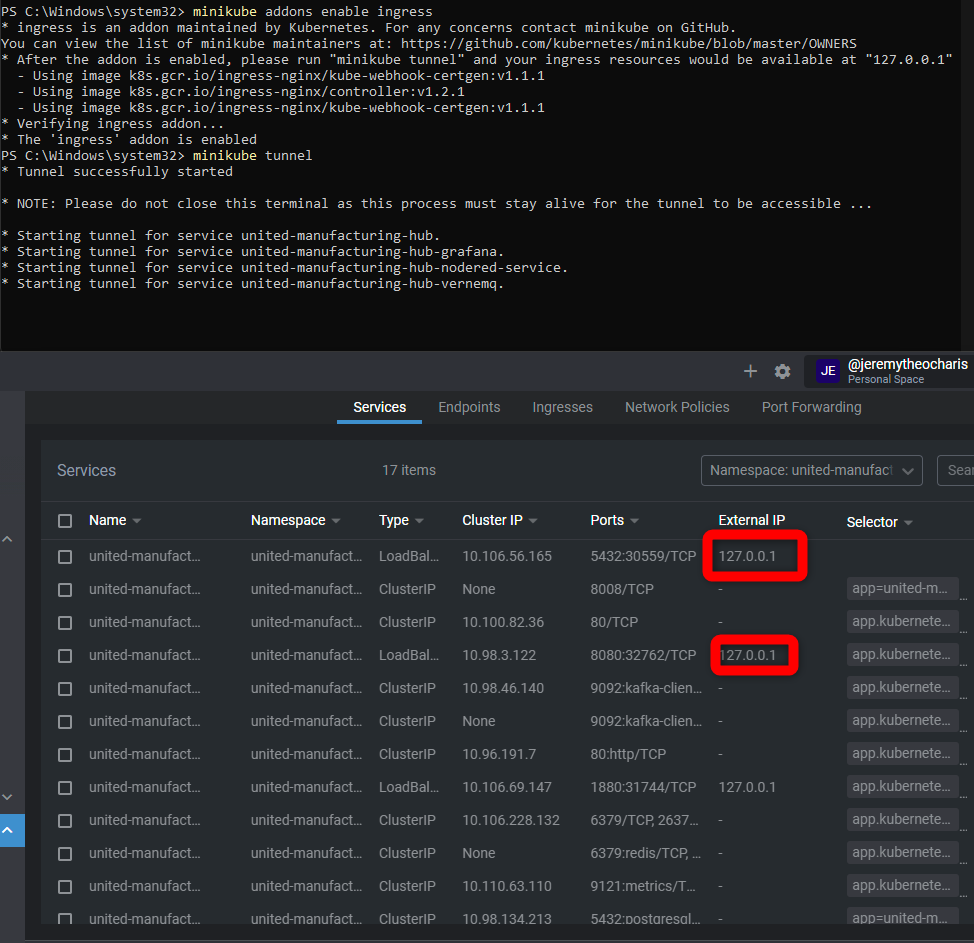
minikube addons enable ingressminikube tunnel
Now it should look like this:

Any you can access Node-RED e.g., via localhost:1880/nodered
This tunnel needs to be always started using minikube tunnel when you want to access these services.


